How the tool works
No sample points to place, it fits a background model on every pixel, then iteratively throws out ("rejects") pixels that look like stars/nebulae/galaxies rather than sky, refits, and repeats until it converges. There are two totally different ways it can build that model: the default multiscale model or the Simplified Model (stiff polynomial). Everything else in the UI tunes one of those two paths.
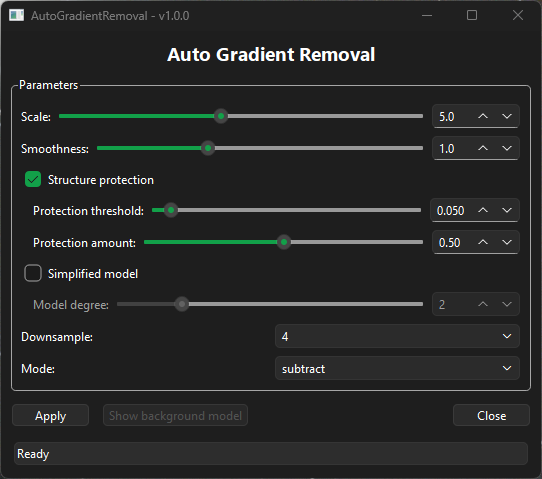
Scale (1.0 – 10.0, step 0.5, default 5.0)
This sets the smoothing radius of the multiscale model, as a percentage of image size (scale 5 ≈ 5% of the shorter image dimension).
Higher = smoother, only removes broad, large-scale gradients.
Lower = the model can follow smaller, more local variations in the background.
When to change it: lower it if you have patchy/local gradients (e.g. light pollution glow in one corner, vignette-like local haze); raise it if a low scale is "eating into" faint diffuse background structure that isn't really a gradient.

Smoothness (0.0 – 3.0, step 0.1, default 1.0)
An extra blur pass applied to the final model after fitting, on top of Scale.
0 = leave the fitted model exactly as computed.
Higher = softer, more gradual result, good for stamping out any residual blotchiness/mottling left in the model.
When to change it: raise it if the subtracted background still shows faint patchy artifacts; lower toward 0 if you need the model to track a legitimately non-smooth gradient.

Structure protection (checkbox, default ON)
Turns on the mechanism that detects extended bright structures (nebulosity, galaxies, large stars) and excludes them from the background fit rather than letting them get "absorbed" into the model and hollowed out. When on, it unlocks two sub-sliders:
Protection threshold (0.0 – 1.0, step 0.005, default 0.05)
How far above the current model a pixel has to be before it's flagged as "structure, not background."
Lower = more sensitive, protects more (even faint structure/dim nebula edges get excluded).
Higher = only strongly bright things get protected; dim nebulosity risks being fit as background and subtracted away.
When to change it: lower it if faint nebulosity is getting eaten into the background model; raise it if too much of the image is being excluded and the fit is starving for background pixels.
Protection amount (0.0 – 1.0, step 0.05, default 0.5)
Controls how far the protection mask grows outward from the detected bright cores, so the dim outer wings of a structure (star halos, nebula edges) get covered too, not just the core.
Higher = bigger safety margin around structures, but shrinks the pool of pixels available to fit the background.
When to change it: raise it if you see a faint "ring" or halo of gradient artifact around bright stars/nebulae after correction (the wings weren't protected); lower it if protection is swallowing too much usable background.

Simplified model (checkbox, default OFF)
Swaps the entire multiscale/inpainting approach for a stiff low-degree polynomial surface instead. Use this specifically when a nebula (or other structure) fills most/all of the frame, in that case there isn't enough clear background left for the multiscale model to lock onto, and it can hollow the object out. A polynomial can't do that; it can only bend gently.
When to change it: turn on for frame-filling targets (e.g., a big nebula that covers most of the field); leave off for normal starfields with clear sky between objects.
Model degree (1 – 6, default 2)
Only active when Simplified model is checked. Sets the polynomial's flexibility.
1 = a flat plane (max stiffness, purely linear tilt).
Higher = allows more complex curvature, but also more risk of it starting to "chase" real structure instead of just the gradient.
When to change it: start at 2 (mild bowl/dome shape); go to 1 if the correction still looks too aggressive/wavy; go up only if a simple gradient shape genuinely isn't being captured (rare — most vignetting/gradient shapes are captured by degree 2).

Downsample (8 / 4 / 2 / 1, default 4)
Purely a performance/working-resolution setting, it shrinks the image internally before fitting (then resizes the model back up), it does not change the background scale itself.
Higher (8) = much faster, coarser internal fit.
Lower (1) = slowest, most precise, but rarely necessary since the background is smooth anyway.
When to change it: raise it for quick previews on large images; drop to 1 only if you suspect the downsampling itself is causing visible loss of fine gradient detail (uncommon).

Mode (subtract / divide, default subtract)
Whether the background model is removed additively or multiplicatively.
Subtract: for additive gradients, light pollution, moon glow, skyfog. The most common case for a stacked, calibrated image.
Divide: for multiplicative effects — vignetting, uneven flat-fielding. Use this if the "gradient" is really a smooth brightness falloff tied to optical vignetting rather than added light.
When to change it: if subtract mode leaves a corrected edge/corner that's darker/brighter in a way that scales with the star intensity (rather than being a flat offset), that's a sign it's multiplicative and you should try divide instead.
